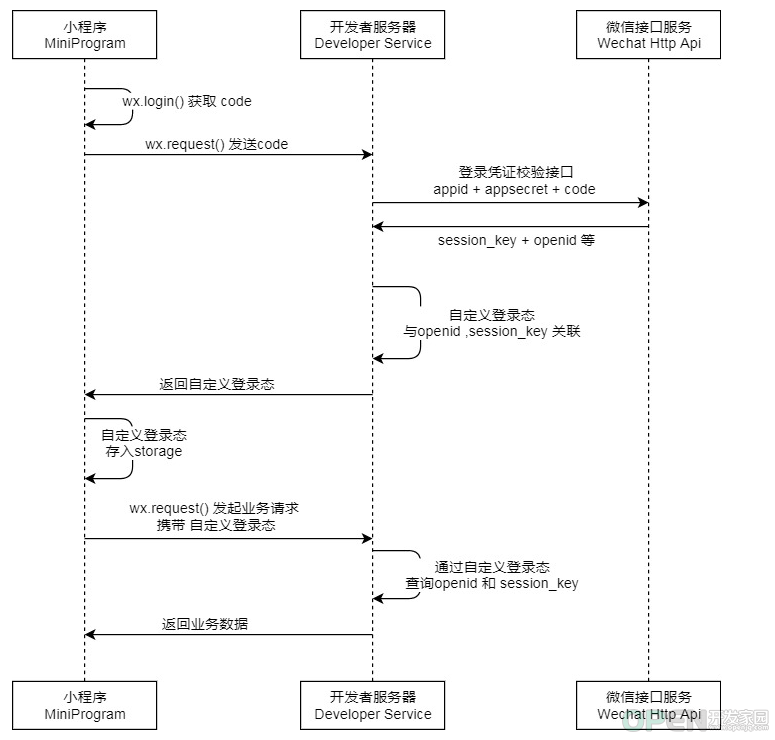
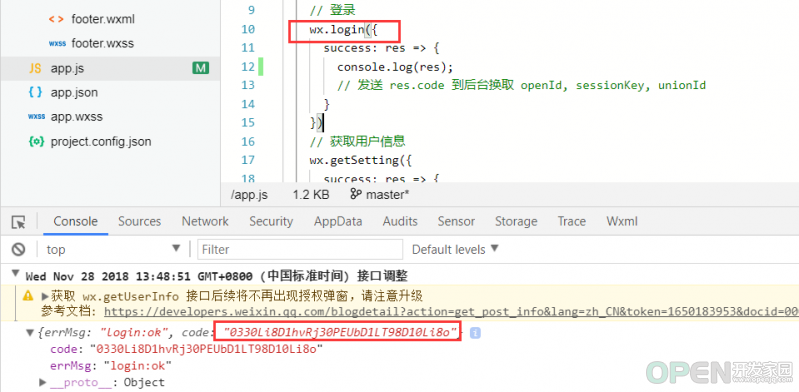
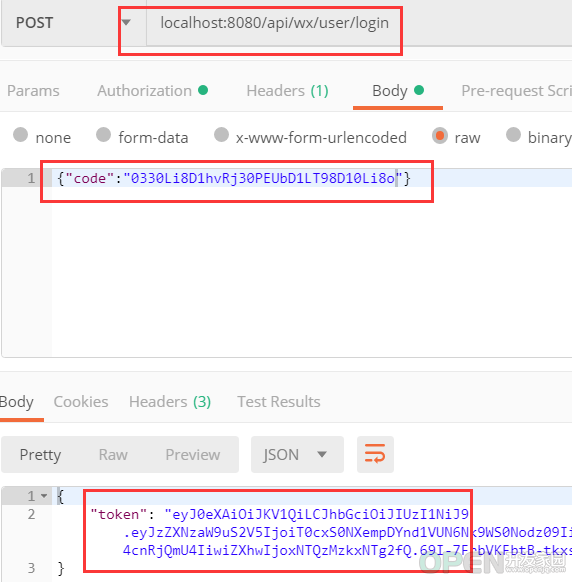
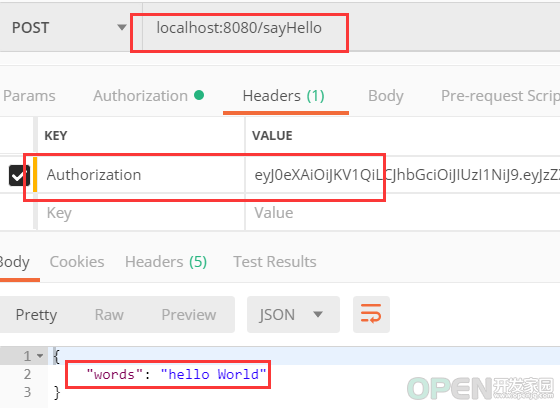
这篇文章主要介绍了Java中基于Shiro,JWT实现微信小程序登录完整例子 ,实现了小程序的自定义登陆,将自定义登陆态token返回给小程序作为登陆凭证。需要的朋友可以参考下
<?xml version="1.0" encoding="utf-8"?>
<project xmlns="http://maven.apache.org/pom/4.0.0" xmlns:xsi="http://www.w3.org/2001/xmlschema-instance"
  xsi:schemalocation="http://maven.apache.org/pom/4.0.0 http://maven.apache.org/xsd/maven-4.0.0.xsd">
 <modelversion>4.0.0</modelversion>
 <groupid>name.ealen</groupid>
 <artifactid>shiro-jwt-applet</artifactid>
 <version>0.0.1-snapshot</version>
 <packaging>jar</packaging>
 <name>shiro-wx-jwt</name>
 <description>demo project for spring boot</description>
 <parent>
 <groupid>org.springframework.boot</groupid>
 <artifactid>spring-boot-starter-parent</artifactid>
 <version>2.0.6.release</version>
 <relativepath/> <!-- lookup parent from repository -->
 </parent>
 <properties>
 <project.build.sourceencoding>utf-8</project.build.sourceencoding>
 <project.reporting.outputencoding>utf-8</project.reporting.outputencoding>
 <java.version>1.8</java.version>
 </properties>
 <dependencies>
 <dependency>
  <groupid>org.springframework.boot</groupid>
  <artifactid>spring-boot-starter-actuator</artifactid>
 </dependency>
 <dependency>
  <groupid>org.springframework.boot</groupid>
  <artifactid>spring-boot-starter-data-jpa</artifactid>
 </dependency>
 <dependency>
  <groupid>org.springframework.boot</groupid>
  <artifactid>spring-boot-starter-data-redis</artifactid>
 </dependency>
 <dependency>
  <groupid>org.springframework.boot</groupid>
  <artifactid>spring-boot-starter-web</artifactid>
 </dependency>
 <dependency>
  <groupid>org.springframework.boot</groupid>
  <artifactid>spring-boot-starter-test</artifactid>
  <scope>test</scope>
 </dependency>
 <dependency>
  <groupid>mysql</groupid>
  <artifactid>mysql-connector-java</artifactid>
 </dependency>
 <dependency>
  <groupid>org.apache.shiro</groupid>
  <artifactid>shiro-spring</artifactid>
  <version>1.4.0</version>
 </dependency>
 <dependency>
  <groupid>com.auth0</groupid>
  <artifactid>java-jwt</artifactid>
  <version>3.4.1</version>
 </dependency>
 <dependency>
  <groupid>com.alibaba</groupid>
  <artifactid>fastjson</artifactid>
  <version>1.2.47</version>
 </dependency>
 </dependencies>
 <build>
 <plugins>
  <plugin>
  <groupid>org.springframework.boot</groupid>
  <artifactid>spring-boot-maven-plugin</artifactid>
  </plugin>
 </plugins>
 </build>
</project>## 请自行修改下面信息
spring:
application:
name: shiro-jwt-applet
jpa:
hibernate:
ddl-auto: create # 请自行修改 请自行修改 请自行修改
# datasource本地配置
datasource:
url: jdbc:mysql://localhost:3306/yourdatabase
username: yourname
password: yourpass
driver-class-name: com.mysql.jdbc.driver
# redis本地配置 请自行配置
redis:
database: 0
host: localhost
port: 6379
# 微信小程序配置 appid /appsecret
wx:
applet:
appid: yourappid
appsecret: yourappsecretpackage name.ealen.domain.entity;
import org.springframework.format.annotation.datetimeformat;
import javax.persistence.entity;
import javax.persistence.generatedvalue;
import javax.persistence.id;
import javax.persistence.table;
import java.util.date;
/**
* created by ealenxie on 2018/11/26 10:26.
* 实体 属性描述 这里只是简单示例,你可以自定义相关用户信息
*/
@entity
@table
public class wxaccount {
@id
@generatedvalue
private integer id;
private string wxopenid;
private string sessionkey;
@datetimeformat(pattern = "yyyy-mm-dd hh:mm:ss")
private date lasttime;
/**
* 省略getter/setter
*/
}package name.ealen.domain.repository;
import name.ealen.domain.entity.wxaccount;
import org.springframework.data.jpa.repository.jparepository;
/**
* created by ealenxie on 2018/11/26 10:32.
*/
public interface wxaccountrepository extends jparepository<wxaccount, integer> {
/**
* 根据openid查询用户信息
*/
wxaccount findbywxopenid(string wxopenid);
}package name.ealen.application;
import name.ealen.interfaces.dto.token;
/**
* created by ealenxie on 2018/11/26 10:40.
* 微信小程序自定义登陆 服务说明
*/
public interface wxappletservice {
/**
* 微信小程序用户登陆,完整流程可参考下面官方地址,本例中是按此流程开发
* https://developers.weixin.qq.com/miniprogram/dev/framework/open-ability/login.html
* 1 . 我们的微信小程序端传入code。
* 2 . 调用微信code2session接口获取openid和session_key
* 3 . 根据openid和session_key自定义登陆态(token)
* 4 . 返回自定义登陆态(token)给小程序端。
* 5 . 我们的小程序端调用其他需要认证的api,请在header的authorization里面携带 token信息
*
* @param code 小程序端 调用 wx.login 获取到的code,用于调用 微信code2session接口
* @return token 返回后端 自定义登陆态 token 基于jwt实现
*/
public token wxuserlogin(string code);
}package name.ealen.interfaces.dto;
/**
* created by ealenxie on 2018/11/26 18:49.
* dto 返回值token对象
*/
public class token {
private string token;
public token(string token) {
this.token = token;
}
/**
* 省略getter/setter
*/
}package name.ealen.infrastructure.config;
import org.springframework.context.annotation.bean;
import org.springframework.context.annotation.configuration;
import org.springframework.http.client.clienthttprequestfactory;
import org.springframework.http.client.simpleclienthttprequestfactory;
import org.springframework.web.client.resttemplate;
/**
* created by ealenxie on 2018-03-23 07:37
* resttemplate的配置类
*/
@configuration
public class resttemplateconfig {
@bean
public resttemplate resttemplate(clienthttprequestfactory factory) {
return new resttemplate(factory);
}
@bean
public clienthttprequestfactory simpleclienthttprequestfactory() {
simpleclienthttprequestfactory factory = new simpleclienthttprequestfactory();
factory.setreadtimeout(1000 * 60); //读取超时时间为单位为60秒
factory.setconnecttimeout(1000 * 10); //连接超时时间设置为10秒
return factory;
}
}package name.ealen.infrastructure.config;
import org.springframework.cache.cachemanager;
import org.springframework.cache.annotation.enablecaching;
import org.springframework.context.annotation.bean;
import org.springframework.context.annotation.configuration;
import org.springframework.data.redis.cache.rediscachemanager;
import org.springframework.data.redis.connection.redisconnectionfactory;
/**
* created by ealenxie on 2018-03-23 07:37
* redis的配置类
*/
@configuration
@enablecaching
public class redisconfig {
@bean
public cachemanager cachemanager(redisconnectionfactory factory) {
return rediscachemanager.create(factory);
}
}package name.ealen.infrastructure.config.jwt;
import name.ealen.domain.vo.jwttoken;
import org.apache.shiro.web.filter.authc.basichttpauthenticationfilter;
import org.springframework.http.httpstatus;
import org.springframework.web.bind.annotation.requestmethod;
import javax.servlet.servletrequest;
import javax.servlet.servletresponse;
import javax.servlet.http.httpservletrequest;
import javax.servlet.http.httpservletresponse;
/**
* created by ealenxie on 2018/11/26 10:26.
* jwt核心过滤器配置
* 所有的请求都会先经过filter,所以我们继承官方的basichttpauthenticationfilter,并且重写鉴权的方法。
* 执行流程 prehandle->isaccessallowed->isloginattempt->executelogin
*/
public class jwtfilter extends basichttpauthenticationfilter {
/**
* 判断用户是否想要进行 需要验证的操作
* 检测header里面是否包含authorization字段即可
*/
@override
protected boolean isloginattempt(servletrequest request, servletresponse response) {
string auth = getauthzheader(request);
return auth != null && !auth.equals("");
}
/**
* 此方法调用登陆,验证逻辑
*/
@override
protected boolean isaccessallowed(servletrequest request, servletresponse response, object mappedvalue) {
if (isloginattempt(request, response)) {
jwttoken token = new jwttoken(getauthzheader(request));
getsubject(request, response).login(token);
}
return true;
}
/**
* 提供跨域支持
*/
@override
protected boolean prehandle(servletrequest request, servletresponse response) throws exception {
httpservletrequest httpservletrequest = (httpservletrequest) request;
httpservletresponse httpservletresponse = (httpservletresponse) response;
httpservletresponse.setheader("access-control-allow-origin", httpservletrequest.getheader("origin"));
httpservletresponse.setheader("access-control-allow-methods", "get,post,options,put,delete");
httpservletresponse.setheader("access-control-allow-headers", httpservletrequest.getheader("access-control-request-headers"));
// 跨域时会首先发送一个option请求,这里我们给option请求直接返回正常状态
if (httpservletrequest.getmethod().equals(requestmethod.options.name())) {
httpservletresponse.setstatus(httpstatus.ok.value());
return false;
}
return super.prehandle(request, response);
}
}package name.ealen.infrastructure.config.jwt;
import com.auth0.jwt.jwt;
import com.auth0.jwt.jwtverifier;
import com.auth0.jwt.algorithms.algorithm;
import com.auth0.jwt.exceptions.jwtdecodeexception;
import name.ealen.domain.entity.wxaccount;
import org.springframework.beans.factory.annotation.autowired;
import org.springframework.data.redis.core.stringredistemplate;
import org.springframework.stereotype.component;
import java.util.date;
import java.util.uuid;
import java.util.concurrent.timeunit;
/**
* created by ealenxie on 2018/11/22 17:16.
*/
@component
public class jwtconfig {
/**
* jwt 自定义密钥 我这里写死的
*/
private static final string secret_key = "5371f568a45e5ab1f442c38e0932aef24447139b";
/**
* jwt 过期时间值 这里写死为和小程序时间一致 7200 秒,也就是两个小时
*/
private static long expire_time = 7200;
@autowired
private stringredistemplate redistemplate;
/**
* 根据微信用户登陆信息创建 token
* 注 : 这里的token会被缓存到redis中,用作为二次验证
* redis里面缓存的时间应该和jwt token的过期时间设置相同
*
* @param wxaccount 微信用户信息
* @return 返回 jwt token
*/
public string createtokenbywxaccount(wxaccount wxaccount) {
string jwtid = uuid.randomuuid().tostring(); //jwt 随机id,做为验证的key
//1 . 加密算法进行签名得到token
algorithm algorithm = algorithm.hmac256(secret_key);
string token = jwt.create()
.withclaim("wxopenid", wxaccount.getwxopenid())
.withclaim("sessionkey", wxaccount.getsessionkey())
.withclaim("jwt-id", jwtid)
.withexpiresat(new date(system.currenttimemillis() + expire_time*1000)) //jwt 配置过期时间的正确姿势
.sign(algorithm);
//2 . redis缓存jwt, 注 : 请和jwt过期时间一致
redistemplate.opsforvalue().set("jwt-session-" + jwtid, token, expire_time, timeunit.seconds);
return token;
}
/**
* 校验token是否正确
* 1 . 根据token解密,解密出jwt-id , 先从redis中查找出redistoken,匹配是否相同
* 2 . 然后再对redistoken进行解密,解密成功则 继续流程 和 进行token续期
*
* @param token 密钥
* @return 返回是否校验通过
*/
public boolean verifytoken(string token) {
try {
//1 . 根据token解密,解密出jwt-id , 先从redis中查找出redistoken,匹配是否相同
string redistoken = redistemplate.opsforvalue().get("jwt-session-" + getjwtidbytoken(token));
if (!redistoken.equals(token)) return false;
//2 . 得到算法相同的jwtverifier
algorithm algorithm = algorithm.hmac256(secret_key);
jwtverifier verifier = jwt.require(algorithm)
.withclaim("wxopenid", getwxopenidbytoken(redistoken))
.withclaim("sessionkey", getsessionkeybytoken(redistoken))
.withclaim("jwt-id", getjwtidbytoken(redistoken))
.acceptexpiresat(system.currenttimemillis() + expire_time*1000 ) //jwt 正确的配置续期姿势
.build();
//3 . 验证token
verifier.verify(redistoken);
//4 . redis缓存jwt续期
redistemplate.opsforvalue().set("jwt-session-" + getjwtidbytoken(token), redistoken, expire_time, timeunit.seconds);
return true;
} catch (exception e) { //捕捉到任何异常都视为校验失败
return false;
}
}
/**
* 根据token获取wxopenid(注意坑点 : 就算token不正确,也有可能解密出wxopenid,同下)
*/
public string getwxopenidbytoken(string token) throws jwtdecodeexception {
return jwt.decode(token).getclaim("wxopenid").asstring();
}
/**
* 根据token获取sessionkey
*/
public string getsessionkeybytoken(string token) throws jwtdecodeexception {
return jwt.decode(token).getclaim("sessionkey").asstring();
}
/**
* 根据token 获取jwt-id
*/
private string getjwtidbytoken(string token) throws jwtdecodeexception {
return jwt.decode(token).getclaim("jwt-id").asstring();
}
}package name.ealen.infrastructure.config.shiro;
import name.ealen.domain.vo.jwttoken;
import name.ealen.infrastructure.config.jwt.jwtconfig;
import org.apache.shiro.authc.authenticationexception;
import org.apache.shiro.authc.authenticationinfo;
import org.apache.shiro.authc.authenticationtoken;
import org.apache.shiro.authc.simpleauthenticationinfo;
import org.apache.shiro.authc.credential.credentialsmatcher;
import org.apache.shiro.authz.authorizationinfo;
import org.apache.shiro.authz.simpleauthorizationinfo;
import org.apache.shiro.realm.authorizingrealm;
import org.apache.shiro.realm.realm;
import org.apache.shiro.subject.principalcollection;
import org.springframework.stereotype.component;
import javax.annotation.resource;
import java.util.collections;
import java.util.linkedlist;
import java.util.list;
/**
* created by ealenxie on 2018/11/26 12:12.
* realm 的一个配置管理类 allrealm()方法得到所有的realm
*/
@component
public class shirorealmconfig {
@resource
private jwtconfig jwtconfig;
/**
* 配置所有自定义的realm,方便起见,应对可能有多个realm的情况
*/
public list<realm> allrealm() {
list<realm> realmlist = new linkedlist<>();
authorizingrealm jwtrealm = jwtrealm();
realmlist.add(jwtrealm);
return collections.unmodifiablelist(realmlist);
}
/**
* 自定义 jwt的 realm
* 重写 realm 的 supports() 方法是通过 jwt 进行登录判断的关键
*/
private authorizingrealm jwtrealm() {
authorizingrealm jwtrealm = new authorizingrealm() {
/**
* 注意坑点 : 必须重写此方法,不然shiro会报错
* 因为创建了 jwttoken 用于替换shiro原生 token,所以必须在此方法中显式的进行替换,否则在进行判断时会一直失败
*/
@override
public boolean supports(authenticationtoken token) {
return token instanceof jwttoken;
}
@override
protected authorizationinfo dogetauthorizationinfo(principalcollection principals) {
return new simpleauthorizationinfo();
}
/**
* 校验 验证token逻辑
*/
@override
protected authenticationinfo dogetauthenticationinfo(authenticationtoken token) {
string jwttoken = (string) token.getcredentials();
string wxopenid = jwtconfig.getwxopenidbytoken(jwttoken);
string sessionkey = jwtconfig.getsessionkeybytoken(jwttoken);
if (wxopenid == null || wxopenid.equals(""))
throw new authenticationexception("user account not exits , please check your token");
if (sessionkey == null || sessionkey.equals(""))
throw new authenticationexception("sessionkey is invalid , please check your token");
if (!jwtconfig.verifytoken(jwttoken))
throw new authenticationexception("token is invalid , please check your token");
return new simpleauthenticationinfo(token, token, getname());
}
};
jwtrealm.setcredentialsmatcher(credentialsmatcher());
return jwtrealm;
}
/**
* 注意坑点 : 密码校验 , 这里因为是jwt形式,就无需密码校验和加密,直接让其返回为true(如果不设置的话,该值默认为false,即始终验证不通过)
*/
private credentialsmatcher credentialsmatcher() {
return (token, info) -> true;
}
}package name.ealen.infrastructure.config.shiro;
import name.ealen.infrastructure.config.jwt.jwtfilter;
import org.apache.shiro.mgt.defaultsessionstorageevaluator;
import org.apache.shiro.mgt.defaultsubjectdao;
import org.apache.shiro.spring.lifecyclebeanpostprocessor;
import org.apache.shiro.spring.security.interceptor.authorizationattributesourceadvisor;
import org.apache.shiro.spring.web.shirofilterfactorybean;
import org.apache.shiro.web.mgt.defaultwebsecuritymanager;
import org.springframework.aop.framework.autoproxy.defaultadvisorautoproxycreator;
import org.springframework.context.annotation.bean;
import org.springframework.context.annotation.configuration;
import org.springframework.context.annotation.dependson;
import javax.servlet.filter;
import java.util.hashmap;
import java.util.map;
/**
* created by ealenxie on 2018/11/22 18:28.
*/
@configuration
public class shirconfig {
/**
* securitymanager,安全管理器,所有与安全相关的操作都会与之进行交互;
* 它管理着所有subject,所有subject都绑定到securitymanager,与subject的所有交互都会委托给securitymanager
* defaultwebsecuritymanager :
* 会创建默认的defaultsubjectdao(它又会默认创建defaultsessionstorageevaluator)
* 会默认创建defaultwebsubjectfactory
* 会默认创建modularrealmauthenticator
*/
@bean
public defaultwebsecuritymanager securitymanager(shirorealmconfig shirorealmconfig) {
defaultwebsecuritymanager securitymanager = new defaultwebsecuritymanager();
securitymanager.setrealms(shirorealmconfig.allrealm()); //设置realm
defaultsubjectdao subjectdao = (defaultsubjectdao) securitymanager.getsubjectdao();
// 关闭自带session
defaultsessionstorageevaluator evaluator = (defaultsessionstorageevaluator) subjectdao.getsessionstorageevaluator();
evaluator.setsessionstorageenabled(boolean.false);
subjectdao.setsessionstorageevaluator(evaluator);
return securitymanager;
}
/**
* 配置shiro的访问策略
*/
@bean
public shirofilterfactorybean factory(defaultwebsecuritymanager securitymanager) {
shirofilterfactorybean factorybean = new shirofilterfactorybean();
map<string, filter> filtermap = new hashmap<>();
filtermap.put("jwt", new jwtfilter());
factorybean.setfilters(filtermap);
factorybean.setsecuritymanager(securitymanager);
map<string, string> filterrulemap = new hashmap<>();
//登陆相关api不需要被过滤器拦截
filterrulemap.put("/api/wx/user/login/**", "anon");
filterrulemap.put("/api/response/**", "anon");
// 所有请求通过jwt filter
filterrulemap.put("/**", "jwt");
factorybean.setfilterchaindefinitionmap(filterrulemap);
return factorybean;
}
/**
* 添加注解支持
*/
@bean
@dependson("lifecyclebeanpostprocessor")
public defaultadvisorautoproxycreator defaultadvisorautoproxycreator() {
defaultadvisorautoproxycreator defaultadvisorautoproxycreator = new defaultadvisorautoproxycreator();
defaultadvisorautoproxycreator.setproxytargetclass(true); // 强制使用cglib,防止重复代理和可能引起代理出错的问题
return defaultadvisorautoproxycreator;
}
/**
* 添加注解依赖
*/
@bean
public lifecyclebeanpostprocessor lifecyclebeanpostprocessor() {
return new lifecyclebeanpostprocessor();
}
/**
* 开启注解验证
*/
@bean
public authorizationattributesourceadvisor authorizationattributesourceadvisor(defaultwebsecuritymanager securitymanager) {
authorizationattributesourceadvisor authorizationattributesourceadvisor = new authorizationattributesourceadvisor();
authorizationattributesourceadvisor.setsecuritymanager(securitymanager);
return authorizationattributesourceadvisor;
}
}package name.ealen.domain.vo;
import org.apache.shiro.authc.authenticationtoken;
/**
* created by ealenxie on 2018/11/22 18:21.
* 鉴权用的token vo ,实现 authenticationtoken
*/
public class jwttoken implements authenticationtoken {
private string token;
public jwttoken(string token) {
this.token = token;
}
@override
public object getprincipal() {
return token;
}
@override
public object getcredentials() {
return token;
}
public string gettoken() {
return token;
}
public void settoken(string token) {
this.token = token;
}
}package name.ealen.domain.service;
import name.ealen.application.wxappletservice;
import name.ealen.domain.entity.wxaccount;
import name.ealen.domain.repository.wxaccountrepository;
import name.ealen.domain.vo.code2sessionresponse;
import name.ealen.infrastructure.config.jwt.jwtconfig;
import name.ealen.infrastructure.util.httputil;
import name.ealen.infrastructure.util.jsonutil;
import name.ealen.interfaces.dto.token;
import org.apache.shiro.authc.authenticationexception;
import org.springframework.beans.factory.annotation.value;
import org.springframework.http.httpentity;
import org.springframework.http.httpheaders;
import org.springframework.http.httpmethod;
import org.springframework.stereotype.service;
import org.springframework.util.linkedmultivaluemap;
import org.springframework.util.multivaluemap;
import org.springframework.web.client.resttemplate;
import javax.annotation.resource;
import java.net.uri;
import java.util.date;
/**
* created by ealenxie on 2018/11/26 10:50.
* 实体 行为描述
*/
@service
public class wxaccountservice implements wxappletservice {
@resource
private resttemplate resttemplate;
@value("${wx.applet.appid}")
private string appid;
@value("${wx.applet.appsecret}")
private string appsecret;
@resource
private wxaccountrepository wxaccountrepository;
@resource
private jwtconfig jwtconfig;
/**
* 微信的 code2session 接口 获取微信用户信息
* 官方说明 : https://developers.weixin.qq.com/miniprogram/dev/api/open-api/login/code2session.html
*/
private string code2session(string jscode) {
string code2sessionurl = "https://api.weixin.qq.com/sns/jscode2session";
multivaluemap<string, string> params = new linkedmultivaluemap<>();
params.add("appid", appid);
params.add("secret", appsecret);
params.add("js_code", jscode);
params.add("grant_type", "authorization_code");
uri code2session = httputil.geturiwithparams(code2sessionurl, params);
return resttemplate.exchange(code2session, httpmethod.get, new httpentity<string>(new httpheaders()), string.class).getbody();
}
/**
* 微信小程序用户登陆,完整流程可参考下面官方地址,本例中是按此流程开发
* https://developers.weixin.qq.com/miniprogram/dev/framework/open-ability/login.html
*
* @param code 小程序端 调用 wx.login 获取到的code,用于调用 微信code2session接口
* @return 返回后端 自定义登陆态 token 基于jwt实现
*/
@override
public token wxuserlogin(string code) {
//1 . code2session返回json数据
string resultjson = code2session(code);
//2 . 解析数据
code2sessionresponse response = jsonutil.jsonstring2object(resultjson, code2sessionresponse.class);
if (!response.geterrcode().equals("0"))
throw new authenticationexception("code2session失败 : " + response.geterrmsg());
else {
//3 . 先从本地数据库中查找用户是否存在
wxaccount wxaccount = wxaccountrepository.findbywxopenid(response.getopenid());
if (wxaccount == null) {
wxaccount = new wxaccount();
wxaccount.setwxopenid(response.getopenid()); //不存在就新建用户
}
//4 . 更新sessionkey和 登陆时间
wxaccount.setsessionkey(response.getsession_key());
wxaccount.setlasttime(new date());
wxaccountrepository.save(wxaccount);
//5 . jwt 返回自定义登陆态 token
string token = jwtconfig.createtokenbywxaccount(wxaccount);
return new token(token);
}
}
}package name.ealen.domain.vo;
/**
* 微信小程序 code2session 接口返回值 对象
* 具体可以参考小程序官方api说明 : https://developers.weixin.qq.com/miniprogram/dev/api/open-api/login/code2session.html
*/
public class code2sessionresponse {
private string openid;
private string session_key;
private string unionid;
private string errcode = "0";
private string errmsg;
private int expires_in;
/**
* 省略getter/setter
*/
}package name.ealen.interfaces.facade;
import name.ealen.application.wxappletservice;
import org.apache.shiro.authz.annotation.requiresauthentication;
import org.springframework.http.httpstatus;
import org.springframework.http.responseentity;
import org.springframework.web.bind.annotation.*;
import javax.annotation.resource;
import java.util.hashmap;
import java.util.map;
/**
* created by ealenxie on 2018/11/26 10:44.
* 小程序后台 某 api
*/
@restcontroller
public class wxappletcontroller {
@resource
private wxappletservice wxappletservice;
/**
* 微信小程序端用户登陆api
* 返回给小程序端 自定义登陆态 token
*/
@postmapping("/api/wx/user/login")
public responseentity wxappletloginapi(@requestbody map<string, string> request) {
if (!request.containskey("code") || request.get("code") == null || request.get("code").equals("")) {
map<string, string> result = new hashmap<>();
result.put("msg", "缺少参数code或code不合法");
return new responseentity<>(result, httpstatus.bad_request);
} else {
return new responseentity<>(wxappletservice.wxuserlogin(request.get("code")), httpstatus.ok);
}
}
/**
* 需要认证的测试接口 需要 @requiresauthentication 注解,则调用此接口需要 header 中携带自定义登陆态 authorization
*/
@requiresauthentication
@postmapping("/sayhello")
public responseentity sayhello() {
map<string, string> result = new hashmap<>();
result.put("words", "hello world");
return new responseentity<>(result, httpstatus.ok);
}
}package name.ealen;
import org.springframework.boot.springapplication;
import org.springframework.boot.autoconfigure.springbootapplication;
/**
* created by ealenxie on 2018/11/26 10:25.
*/
@springbootapplication
public class shirojwtappletapplication {
public static void main(string[] args) {
springapplication.run(shirojwtappletapplication.class, args);
}总结 CodeAE代码之家 网站的支持! 
![]() 编程语言
发布于:2021-10-07 12:21
|
阅读数:371
|
评论:0
编程语言
发布于:2021-10-07 12:21
|
阅读数:371
|
评论:0


 QQ好友和群
 QQ空间
QQ空间