OkHttp已经是非常流行的android客户端的网络请求框架,我其实在项目中使用也已经好几年了,之前一直把重心放在如何快速的搞定业务上、迭代的效率上,这一点来讲,对于一个公司优秀员工是没有毛病的。但是越到后面,你会发现,真正的高效,是你对技术的更深层次的理解,对技术更熟练的掌握。所以今天重回技术本身,搞清楚OkHttp的实现机制和部分源码分析,也提醒阅读本篇文章的同学,除了在公司加班加点赶业务进度的同时,从长远角度看,提深自我的技术技能,才是对公司和自己的双赢结果。一、OkHttp的最基础的核心类介绍 选型支撑: 支持HTTP/2,允许所有同一个主机地址的请求共享同一个socket 连接 连接池减少请求延时 透明的GZIP压缩减少响应数据的大小 缓存响应内容,避免一些完全重复的请求 核心类介绍: private String url = "http://www.baidu.com";
void okHttpTest() {
//核心客户端类
OkHttpClient okHttpClient = new OkHttpClient.Builder().build();
//构建请求的类
Request request = new Request.Builder().url(url).build();
//构建调用类
Call call = okHttpClient.newCall(request);
//同步调用
call.execute();
//入队列异步调用
call.enqueue(new Callback() {
@Override
public void onFailure(Call call, IOException e) {
}
@Override
public void onResponse(Call call, Response response/*响应核心类*/) throws IOException {
}
});
}二、OkHttp原理流程源码分析 2.1OkHttp发起网络请求的两种方式 1、同步请求 @Override public Response execute() throws IOException {
...
try {
//调用分发器执行
client.dispatcher().executed(this);
//真正的执行代码在此方法中,最终会返回Response对象,这个方法的核心实现拦截器的相关逻辑
Response result = getResponseWithInterceptorChain();
if (result == null) throw new IOException("Canceled");
return result;
}
....
}/**Used by Call#execute to signal it is in-flight.*/
synchronized void executed(RealCall call) {
//未做任何执行操作,只是添加到运行队列,便于对请求的取消操作进行统一管理
runningSyncCalls.add(call);
}2、异步请求 @Override public void enqueue(Callback responseCallback) {
//当前call正在被执行的一个判定
synchronized (this) {
if (executed) throw new IllegalStateException("Already Executed");
executed = true;
}
captureCallStackTrace();
eventListener.callStart(this);
//这里实际调用了dispatcher的enqueue方法(小细节 这里在RealCall内部创建Asyncall的对象实例)
client.dispatcher().enqueue(new AsyncCall(responseCallback));
}/**
* 源码中注释的解释:Policy on when async requests are executed.
* 首先Dispatcher这里被定义为分发器,处理异步请求执行时的策略
*/
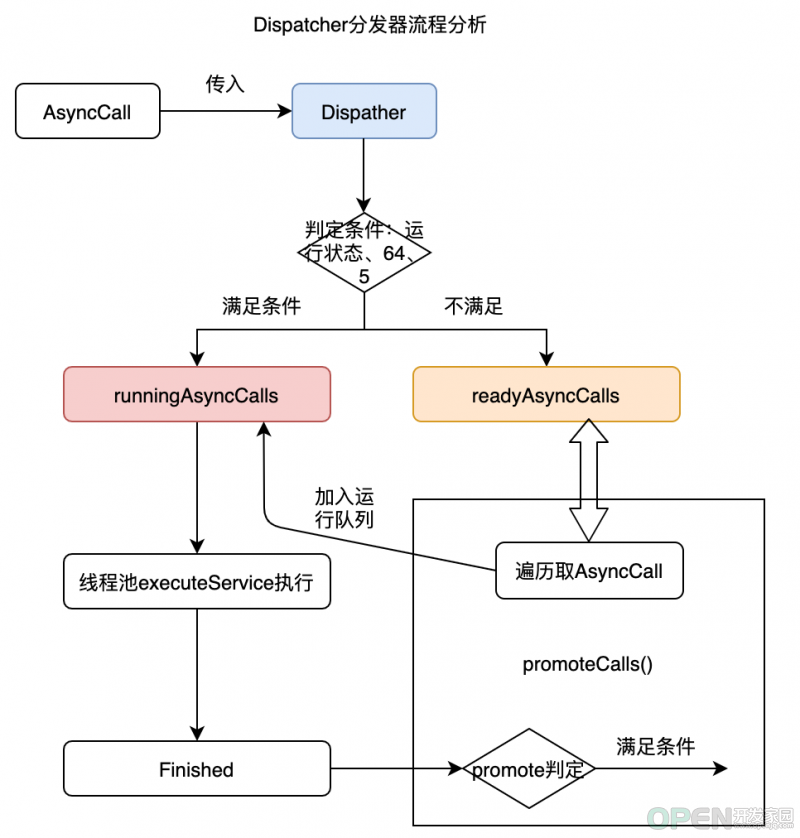
public final class Dispatcher {
//最大请求数
private int maxRequests = 64;
//同一个host地址的最大请求数
private int maxRequestsPerHost = 5;
/** Running asynchronous calls. Includes canceled calls that haven't finished yet. */
/** 正在执行的任务,包括刚被取消未完成的;这里Deque Double end queue*/
private final Deque<AsyncCall> runningAsyncCalls = new ArrayDeque<>();
/** Ready async calls in the order they'll be run. */
/** 准备好将被按顺序执行的call任务*/
private final Deque<AsyncCall> readyAsyncCalls = new ArrayDeque<>();
....
synchronized void enqueue(AsyncCall call) {
//判定条件入不同的队列
if (runningAsyncCalls.size() < maxRequests && runningCallsForHost(call) < maxRequestsPerHost) {
runningAsyncCalls.add(call);
//使用线程池执行call
executorService().execute(call);
} else {
readyAsyncCalls.add(call);
}
}
....
}什么使用这种数据结构? final class AsyncCall extends NamedRunnable {
private final Callback responseCallback;
AsyncCall(Callback responseCallback) {
super("OkHttp %s", redactedUrl());
this.responseCallback = responseCallback;
}
//orginalRequest,就是在构建RealCall对象的时候,把先前构建的Request对象传入的
String host() {
return originalRequest.url().host();
}
Request request() {
return originalRequest;
}
RealCall get() {
return RealCall.this;
}
@Override protected void execute() {
boolean signalledCallback = false;
try {
//真实发起请求的逻辑实现在拦截器中的逻辑中。
Response response = getResponseWithInterceptorChain();
....
} catch (IOException e) {
...
}
} finally {
//finished方法是对Dispatcher中运行时队列的移除操作
client.dispatcher().finished(this);
}
}
}
}private <T> void finished(Deque<T> calls, T call, boolean promoteCalls) {
int runningCallsCount;
Runnable idleCallback;
synchronized (this) {
//前面分析到同步运行时任务和异步执行时任务都会添加到Dispatcher的运行时队列中,通过finished方法移除
if (!calls.remove(call)) throw new AssertionError("Call wasn't in-flight!");
//这个是啥?继续看这个方法的源码了
if (promoteCalls) promoteCalls();
//异步任务和同步任务正在执行的和
runningCallsCount = runningCallsCount();
idleCallback = this.idleCallback;
}
if (runningCallsCount == 0 && idleCallback != null) {
idleCallback.run();
}
}finished(runningSyncCalls, call, false)public final class Dispatcher {
private void promoteCalls() {
//请求的最大限制
if (runningAsyncCalls.size() >= maxRequests) return; // Already running max capacity.
//无等待队列
if (readyAsyncCalls.isEmpty()) return; // No ready calls to promote.
// 从上述英文注释,可以看出“无等待队列中的call需要提升”。
// 遍历处理等待队列
for (Iterator<AsyncCall> i = readyAsyncCalls.iterator(); i.hasNext(); ) {
AsyncCall call = i.next();
if (runningCallsForHost(call) < maxRequestsPerHost) {
i.remove();
//添加到运行队列
runningAsyncCalls.add(call);
//线程池执行
executorService().execute(call);
//上述两句代码和我正常发起异步网络请求是一致的,只是call是从等待队列中取出放到运行队列中
}
if (runningAsyncCalls.size() >= maxRequests) return; // Reached max capacity.
}
}
}2.3Dispatcher分发器流程小结 Dispatcher分发器 :管理同步请求和异步请求,对于同步请求只做标记清理作用,对于异步请求同时处理等待队列和运行时队列的转移策略。2.2OkHttp中的拦截器相关源码流程分析 final class RealCall implements Call {
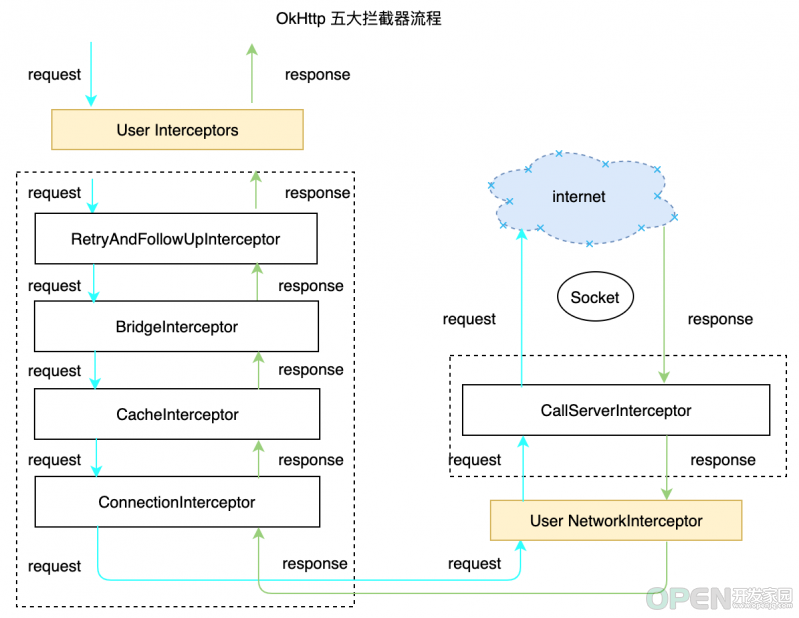
Response getResponseWithInterceptorChain() throws IOException {
// 构建一个拦截器的集合
List<Interceptor> interceptors = new ArrayList<>();
// 向集合中添加通过Client客户端添加的拦截器
interceptors.addAll(client.interceptors());
// 添加重试、重定向拦截器
interceptors.add(retryAndFollowUpInterceptor);
// 添加桥拦截器
interceptors.add(new BridgeInterceptor(client.cookieJar()));
// 添加缓存拦截器
interceptors.add(new CacheInterceptor(client.internalCache()));
// 添加缓存拦截器
interceptors.add(new ConnectInterceptor(client));
if (!forWebSocket) {
// 非webSocket添加网络拦截器
interceptors.addAll(client.networkInterceptors());
}
// 添加访问服务的拦截器
interceptors.add(new CallServerInterceptor(forWebSocket));
Interceptor.Chain chain = new RealInterceptorChain(interceptors, null, null, null, 0,
originalRequest, this, eventListener, client.connectTimeoutMillis(),
client.readTimeoutMillis(), client.writeTimeoutMillis());
// 返回拦截器执行后的结果
return chain.proceed(originalRequest);
}
}public Response proceed(Request request, StreamAllocation streamAllocation, HttpCodec httpCodec, RealConnection connection) throws IOException {
...
//创建一个新的next chain,实际上就是将当前的拦截器从链中排除
RealInterceptorChain next = new RealInterceptorChain(this.interceptors, streamAllocation, httpCodec, connection, this.index + 1, request, this.call, this.eventListener, this.connectTimeout, this.readTimeout, this.writeTimeout);
//按照索引取拦截器
Interceptor interceptor = (Interceptor)this.interceptors.get(this.index);
//执行拦截器的intecept拦截逻辑,并持有next的引用,并继续执行,直到被处理完毕
Response response = interceptor.intercept(next);
...
return response;
}1、retryAndFollowUpInterceptor public Response intercept(Chain chain) throws IOException {
...
while(!this.canceled) {
Response response;
try {
//责任链式调用
response = realChain.proceed(request, streamAllocation, (HttpCodec)null, (RealConnection)null);
releaseConnection = false;
} catch (RouteException var17) {
//路由异常
if (!this.recover(...)) {
//判定是否能够满足重试条件
throw var17.getLastConnectException();
}
releaseConnection = false;
//重试
continue;
} catch (IOException var18) {
//IO异常
boolean requestSendStarted = !(var18 instanceof ConnectionShutdownException);
if (!this.recover(...)) {
//判定是否满足重试条件
throw var18;
}
releaseConnection = false;
//重试
continue;
} finally {
.....
}
....
//重定向部分的调用
Request followUp = this.followUpRequest(response, streamAllocation.route());
if (followUp == null) {
if (!this.forWebSocket) {
streamAllocation.release();
}
return response;
}
....
}
}private boolean recover(IOException e, StreamAllocation streamAllocation, boolean requestSendStarted, Request userRequest) {
streamAllocation.streamFailed(e);
if (!this.client.retryOnConnectionFailure()) {
// 构建OkHttpClient的时候,设置了不允许重试,则失败就结束
return false;
} else if (requestSendStarted && userRequest.body() instanceof UnrepeatableRequestBody) { // io异常:boolean requestSendStarted =!(var18 instanceof ConnectionShutdownException);
// 路由异常,requestSendStarted默认是false
return false;
} else if (!this.isRecoverable(e, requestSendStarted)) {
// 判断是否是可发起重试异常
return false;
} else {
// 判断是否有跟多路由
return streamAllocation.hasMoreRoutes();
}
}private boolean isRecoverable(IOException e, boolean requestSendStarted) {
//协议异常 无法重试
if (e instanceof ProtocolException) {
return false;
} else if (!(e instanceof InterruptedIOException)) {
if (e instanceof SSLHandshakeException && e.getCause() instanceof CertificateException) {
// ssl握手证书问题 false,无法重试
return false;
} else {
// ssl 未认证异常
return !(e instanceof SSLPeerUnverifiedException);
}
} else {
// socket超时 正常重试,这个也是我们平时最常见看到的重试触发点
return e instanceof SocketTimeoutException && !requestSendStarted;
}
}小结一下: (因为流程并不复杂就不配流程图了)2、BridgeInterceptor public Response intercept(Chain chain) throws IOException {
Request userRequest = chain.request();
Builder requestBuilder = userRequest.newBuilder();
RequestBody body = userRequest.body();
if (body != null) {
MediaType contentType = body.contentType();
if (contentType != null) {
//设置请求头
requestBuilder.header("Content-Type", contentType.toString());
}
// 是指请求的内容长度
long contentLength = body.contentLength();
if (contentLength != -1L) {
requestBuilder.header("Content-Length", Long.toString(contentLength));
requestBuilder.removeHeader("Transfer-Encoding");
} else {
requestBuilder.header("Transfer-Encoding", "chunked");
requestBuilder.removeHeader("Content-Length");
}
}
// 设置请求的主机地址
if (userRequest.header("Host") == null) {
requestBuilder.header("Host", Util.hostHeader(userRequest.url(), false));
}
// 设置连接属性
if (userRequest.header("Connection") == null) {
requestBuilder.header("Connection", "Keep-Alive");
}
// 设置接收编码
boolean transparentGzip = false;
if (userRequest.header("Accept-Encoding") == null && userRequest.header("Range") == null) {
transparentGzip = true;
requestBuilder.header("Accept-Encoding", "gzip");
}
// 设置cookie
List<Cookie> cookies = this.cookieJar.loadForRequest(userRequest.url());
if (!cookies.isEmpty()) {
requestBuilder.header("Cookie", this.cookieHeader(cookies));
}
// 设置请求头的用户代理
if (userRequest.header("User-Agent") == null) {
requestBuilder.header("User-Agent", Version.userAgent());
}
Response networkResponse = chain.proceed(requestBuilder.build());
// 获取响应头
HttpHeaders.receiveHeaders(cookieJar, userRequest.url(), networkResponse.headers()
// 处理是否进行gzip解压...
.....
}
return responseBuilder.build();
}3、CacheInterceptor public Response intercept(Chain chain) throws IOException {
// 读取候选的旧缓存,cacheCandidate,命名确实很好
Response cacheCandidate = this.cache != null ? this.cache.get(chain.request()) : null;
long now = System.currentTimeMillis();
// 解析请求的缓存策略
CacheStrategy strategy = (new Factory(now, chain.request(), cacheCandidate)).get();
// CacheStrategy的两个成员变量,用于确定缓存的使用策略
Request networkRequest = strategy.networkRequest;//如果是null,不使用网络请求
Response cacheResponse = strategy.cacheResponse; //如果是null,不用缓存
//上述两个成员变量,理论上能组成四种缓存策略,可以直接查看下文中的表格解析
....
//如果不使用网络请求、而缓存响应也为空,则返回504
if (networkRequest == null && cacheResponse == null) {
return (new Builder()).request(...).protocol(Protocol.HTTP_1_1)
.code(504).message("..")...build();
} else if (networkRequest == null) {
//不是用网络请求,cacheResponse非空,直接返回缓存响应
return cacheResponse.newBuilder().cacheResponse(stripBody(cacheResponse)).build();
} else {
//networkRequest 不为null,使用网络请求
Response networkResponse = null;
try {
//推进责任链式调用继续执行
networkResponse = chain.proceed(networkRequest);
}
Response response;
if (cacheResponse != null) {
// 缓存存在
if (networkResponse.code() == HTTP_NOT_MODIFIED) {
// 响应码为HTTP_NOT_MODIFIED就是304,304是无响应body的,表明缓存有效,直接使用缓存响应
response = cacheResponse.newBuilder().headers(combine(cacheResponse.headers(), networkResponse.headers())).sentRequestAtMillis(networkResponse.sentRequestAtMillis()).receivedResponseAtMillis(networkResponse.receivedResponseAtMillis()).cacheResponse(stripBody(cacheResponse)).networkResponse(stripBody(networkResponse)).build();
networkResponse.body().close();
this.cache.trackConditionalCacheHit();
this.cache.update(cacheResponse, response);
//通过缓存响应构建真实的缓存返回
return response;
}
Util.closeQuietly(cacheResponse.body());
}
//无缓存匹配情况
response = networkResponse.newBuilder().cacheResponse(stripBody(cacheResponse)).
networkResponse(stripBody(networkResponse)).build();
if (this.cache != null) {
//OKHttpClient创建的时候配置了使用缓存,一般为一个请求第一次发起会出现,配置了缓存无缓存的情况
if (HttpHeaders.hasBody(response) && CacheStrategy.isCacheable(response, networkRequest)) {
//更新缓存
CacheRequest cacheRequest = this.cache.put(response);
return this.cacheWritingResponse(cacheRequest, response);
}
....
}
return response;
}
}NetworkRequest CacheResponse 组合结果说明 null null 既不使用网络,有没有缓存,肯定就没数据返回了,返回504 null not null 不使用网络,缓存非空,就使用缓存 not null null 使用网络请求,缓存为空 not null not null 发起网络请求,返回304(无修改),则直接用缓存的响应,返回200,更新缓存响应并返回(只缓存get请求)
缓存拦截器的主流程,都是在与对缓存策略的处理上,主要搞清楚组合情况就可以了。使用缓存技术也并非OkHttp特有的技术,而是Http的基础。要在应用开发中使用缓存,不仅能够给用户更好的体验,同时也能减小服务器的压力。4、ConnectInterceptor /** 打开一个到目标服务器的连接以及执行下一个拦截器 */
public final class ConnectInterceptor implements Interceptor {
public final OkHttpClient client;
public ConnectInterceptor(OkHttpClient client) {
this.client = client;
}
@Override public Response intercept(Chain chain) throws IOException {
RealInterceptorChain realChain = (RealInterceptorChain) chain;
Request request = realChain.request();
StreamAllocation streamAllocation = realChain.streamAllocation();
// We need the network to satisfy this request. Possibly for validating a conditional GET.
boolean doExtensiveHealthChecks = !request.method().equals("GET");
//关键代码
HttpCodec httpCodec = streamAllocation.newStream(client, chain, doExtensiveHealthChecks);
//创建一个链接
RealConnection connection = streamAllocation.connection();
return realChain.proceed(request, streamAllocation, httpCodec, connection);
}
}5、CallServerInterceptor /** OkHttp拦截器链条中的最后一个拦截器,真实发起网络请求 */
public final class CallServerInterceptor implements Interceptor {
...
@Override public Response intercept(Chain chain) throws IOException {
...
//发送请求头
realChain.eventListener().requestHeadersStart(realChain.call());
httpCodec.writeRequestHeaders(request);
realChain.eventListener().requestHeadersEnd(realChain.call(), request);
Response.Builder responseBuilder = null;
//请求体的许可(内部实现是非Get、非Header方法,则许可通过))&& 请求的body非空
if (HttpMethod.permitsRequestBody(request.method()) && request.body() != null) {
// 如果请求头中是“Expect: 100-continue”,等待HTTP/1.1 响应后,向服务器传输request body请求体数据,如果没有获取服务器的100响应,则直接return 4xx,并不在传输request body请求体数据。
if ("100-continue".equalsIgnoreCase(request.header("Expect"))) {
//将头部内容请求发送给服务器
httpCodec.flushRequest();
realChain.eventListener().responseHeadersStart(realChain.call());
//读取响应头,正常响应“Expect:100-continue”,即返回的响应码为100,responseBuilder获取的响应头将非空
responseBuilder = httpCodec.readResponseHeaders(true);
}
//正常响应
if (responseBuilder == null) {
// 头部交互完成后,正常写入请求体
realChain.eventListener().requestBodyStart(realChain.call());
long contentLength = request.body().contentLength();
CountingSink requestBodyOut =
new CountingSink(httpCodec.createRequestBody(request, contentLength));
BufferedSink bufferedRequestBody = Okio.buffer(requestBodyOut);
// 真实写入请求体部分的源码实现
request.body().writeTo(bufferedRequestBody);
bufferedRequestBody.close();
realChain.eventListener()
.requestBodyEnd(realChain.call(), requestBodyOut.successfulCount);
} else if (!connection.isMultiplexed()) {
// 如若 "Expect: 100-continue" 并未返回, 禁止HTTP/1的连接被复用
// 除此之外,我们仍然传输请求体给服务是的服务处于一个固定状态。()
streamAllocation.noNewStreams();
}
}
// 请求结束
httpCodec.finishRequest();
// 构建响应头
if (responseBuilder == null) {
realChain.eventListener().responseHeadersStart(realChain.call());
responseBuilder = httpCodec.readResponseHeaders(false);
}
// 构建响应数据
Response response = responseBuilder
.request(request)
.handshake(streamAllocation.connection().handshake())
.sentRequestAtMillis(sentRequestMillis)
.receivedResponseAtMillis(System.currentTimeMillis())
.build();
// 如果这个响应码又是个100
int code = response.code();
if (code == 100) {
// 当我们并发送一个请求,服务端给响应100
// 就尝试在读取一遍实际的响应数据
responseBuilder = httpCodec.readResponseHeaders(false);
response = responseBuilder
.request(request)
.handshake(streamAllocation.connection().handshake())
.sentRequestAtMillis(sentRequestMillis)
.receivedResponseAtMillis(System.currentTimeMillis())
.build();
code = response.code();
}
realChain.eventListener()
.responseHeadersEnd(realChain.call(), response);
// code 101 情况
if (forWebSocket && code == 101) {
// 连接升级
response = response.newBuilder()
.body(Util.EMPTY_RESPONSE)
.build();
} else {
response = response.newBuilder()
.body(httpCodec.openResponseBody(response))
.build();
}
...
return response;
}到此 ,整个OkHttp发起一个网络请求的拦截器流程也就分析完了。三、总结 
![]() 数据库
发布于:2021-12-27 16:30
|
阅读数:368
|
评论:0
数据库
发布于:2021-12-27 16:30
|
阅读数:368
|
评论:0


 QQ好友和群
 QQ空间
QQ空间