SSH架构确实是很烦人的一个地方,会出错的地方很多,不是缺少包就是包重复,或是配置错误。我花了一整天的时间,整理了一下,构建出一个可运行的项目,用的框架分别是struts2.3,hibernate3.0和spring3.1,基于注解的方法,使用的数据库是mysql,IDE是myeclipse(其它均可)。注解的好处是不用写许多的配置文件,本人也是比较喜欢的。
这个项目只是一个最基本的能运行的由ssh2架构的项目,不包含其它功能,所以我称它为屌丝版。后期会给它加上一些高级功能,在这先卖下关子(哈哈,我还不知道要加哪些才好)。
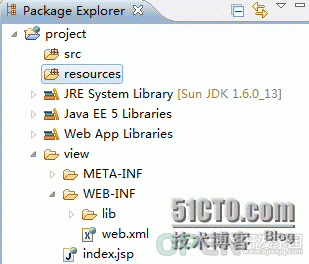
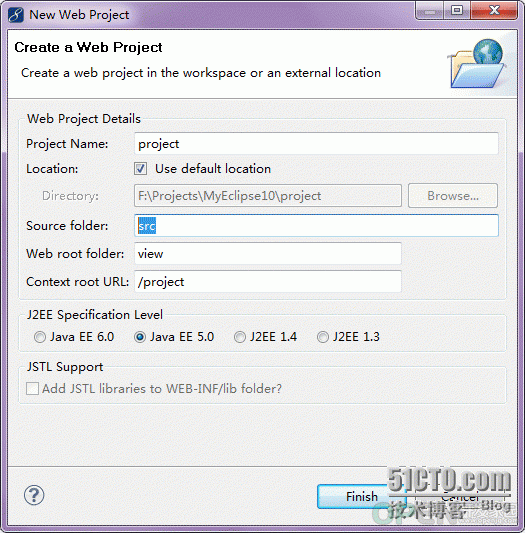
首先创建一个eclipse web项目。其次就是添加包。这里我就不详细说了。因为我还没有到大神程度,
不能给各位仔细解释各个包
的用途,所以只能一股脑地加进去。这些包等下我会提供。
添加完包之后是修改web.xml文件(WEB-INF目录下)。现在先进行struts过滤器配置,用来拦截网页请求。如下:<?xml version="1.0" encoding="UTF-8"?>
<web-app version="2.4"
xmlns="http://java.sun.com/xml/ns/j2ee"
xmlns:xsi="http://www.w3.org/2001/XMLSchema-instance"
xsi:schemaLocation="http://java.sun.com/xml/ns/j2ee
http://java.sun.com/xml/ns/j2ee/web-app_2_4.xsd">
<welcome-file-list>
<welcome-file>login.jsp</welcome-file>
</welcome-file-list>
<filter>
<filter-name>struts</filter-name>
<filter-class>org.apache.struts2.dispatcher.ng.filter.StrutsPrepareAndExecuteFilter</filter-class>
</filter>
<filter-mapping>
<filter-name>struts</filter-name>
<url-pattern>*.action</url-pattern>
</filter-mapping>
</web-app>
配置完之后在根目录下新建一个Source Folder,我把它取名为resources,用来存放配置文件。目录结构如下。

在resources目录下新建一个struts.xml配置文件。配置struts的基本信息。由于需要用spring管理,所以预先加上一句<constant name="struts.objectFactory" value="spring" />
代码如下<?xml version="1.0" encoding="UTF-8"?>
<!DOCTYPE struts PUBLIC
"-//Apache Software Foundation//DTD Struts Configuration 2.3//EN"
"http://struts.apache.org/dtds/struts-2.3.dtd">
<struts>
<!-- 指定wb应用的默认编码集 -->
<constant name="struts.i18n.encoding" value="UTF-8" />
<!-- 指定struts的请求后缀,默认为action -->
<constant name="struts.action.extension" value="action" />
<!-- 设置浏览器是否缓存静态内容,默认值为true,开发环境最好关闭 -->
<constant name="struts.serve.static.browserCache" value="false" />
<!-- 配置文件修改时是否自动重新加载该文件,默认值为false,开发阶段最好打开 -->
<constant name="struts.configuration.xml.reload" value="true" />
<!-- 是否允许动态方法调用 -->
<constant name="struts.enable.DynamicMethodInvocation" value="true" />
<!-- 开发模式 -->
<constant name="struts.devMode" value="true" />
<!-- 与spring进行整合 -->
<constant name="struts.objectFactory" value="spring" />
<!-- 上传文件的大小 -->
<constant name="struts.multipart.maxSize" value="10485760" />
<include file="ref/login.xml" />
</struts>
struts至此基本就配置完成了。现在开始配置spring
在resources目录下面新建一个jdbc.properties文件,用来保存数据库信息。#mysql
jdbc.Driver=com.mysql.jdbc.Driver
jdbc.Url=jdbc:mysql://localhost:3306/test
jdbc.username=gyh
jdbc.password=passwd
hibernate.dialect=org.hibernate.dialect.MySQLDialect
##sql Server
#jdbc.Driver=com.microsoft.sqlserver.jdbc.SQLServerDriver
#jdbc.Url=jdbc:sqlserver://localhost:4462;DatabaseName=test
#jdbc.username=sa
#jdbc.password=123
#hibernate.dialect=org.hibernate.dialect.SQLServerDialect
此处我添加了mysql与sql server的信息,前面加#号的表示注释。
在resources目录下面新建一个spring.xml文件,用来配置spring,内容如下。由于将hibernate交给spring管理,所以不用添加hibernate配置文件。<?xml version="1.0" encoding="UTF-8"?>
<beans xmlns="http://www.springframework.org/schema/beans"
xmlns:xsi="http://www.w3.org/2001/XMLSchema-instance" xmlns:context="http://www.springframework.org/schema/context"
xmlns:aop="http://www.springframework.org/schema/aop" xmlns:tx="http://www.springframework.org/schema/tx"
xsi:schemaLocation="http://www.springframework.org/schema/beans
http://www.springframework.org/schema/beans/spring-beans-3.1.xsd
http://www.springframework.org/schema/context
http://www.springframework.org/schema/context/spring-context-3.1.xsd
http://www.springframework.org/schema/aop
http://www.springframework.org/schema/aop/spring-aop-3.1.xsd
http://www.springframework.org/schema/tx
http://www.springframework.org/schema/tx/spring-tx-3.1.xsd">
<!-- 使用注解的方式 -->
<context:annotation-config />
<!-- 自动扫描包 -->
<context:component-scan base-package="com.*" />
<!-- 引入参数配置文件 -->
<bean id="propertyConfigurer"
class="org.springframework.beans.factory.config.PropertyPlaceholderConfigurer">
<property name="location" value="classpath:jdbc.properties" />
</bean>
<!-- 配置数据源 -->
<bean id="dataSource" class="com.mchange.v2.c3p0.ComboPooledDataSource" destroy-method="close">
<property name="driverClass" value="${jdbc.Driver}" />
<property name="jdbcUrl" value="${jdbc.Url}" />
<property name="user" value="${jdbc.username}" />
<property name="password" value="${jdbc.password}" />
<!--初始化时获取的连接数,取值应在minPoolSize与maxPoolSize之间。Default: 3 -->
<property name="initialPoolSize" value="1"/>
<!-- 连接池中保留的最小连接数 -->
<property name="minPoolSize" value="1"/>
<!-- 连接池中保留的最大连接数 -->
<property name="maxPoolSize" value="300"/>
<!-- 最大空闲时间,若60秒内未使用则丢弃。默认为0,即永不丢弃 -->
<property name="maxIdleTime" value="60"/>
<!--每60秒检查所有连接池中的空闲连接。Default: 0 -->
<property name="idleConnectionTestPeriod" value="60"/>
</bean>
<!-- sessionFactory -->
<bean id="sessionFactory" class="org.springframework.orm.hibernate3.annotation.AnnotationSessionFactoryBean">
<property name="dataSource" ref="dataSource"/>
<property name="packagesToScan" value="com.*"/>
<property name="hibernateProperties">
<props>
<prop key="hibernate.dialect">${hibernate.dialect}</prop>
<prop key="hibernate.show_sql">true</prop>
<prop key="hibernate.query.factory_class">org.hibernate.hql.ast.ASTQueryTranslatorFactory</prop>
<prop key="hibernate.cache.provider_class">org.hibernate.cache.HashtableCacheProvider</prop>
</props>
</property>
</bean>
<!-- hibernateTemplate -->
<bean id="hibernateTemplate" class="org.springframework.orm.hibernate3.HibernateTemplate">
<constructor-arg index="0">
<ref bean="sessionFactory"/>
</constructor-arg>
</bean>
</beans>
配置好spring信息还需要在web.xml文件中加上spring的监听器,修改后的web.xml内容如下<?xml version="1.0" encoding="UTF-8"?>
<web-app version="2.4"
xmlns="http://java.sun.com/xml/ns/j2ee"
xmlns:xsi="http://www.w3.org/2001/XMLSchema-instance"
xsi:schemaLocation="http://java.sun.com/xml/ns/j2ee
http://java.sun.com/xml/ns/j2ee/web-app_2_4.xsd">
<welcome-file-list>
<welcome-file>login.jsp</welcome-file>
</welcome-file-list>
<context-param>
<param-name>contextConfigLocation</param-name>
<param-value>classpath:spring.xml</param-value>
</context-param>
<filter>
<filter-name>struts</filter-name>
<filter-class>org.apache.struts2.dispatcher.ng.filter.StrutsPrepareAndExecuteFilter</filter-class>
</filter>
<filter-mapping>
<filter-name>struts</filter-name>
<url-pattern>*.action</url-pattern>
</filter-mapping>
<listener>
<listener-class>org.springframework.web.context.ContextLoaderListener</listener-class>
</listener>
</web-app>
至此,框架的配置基本上就完成了。现在给它加上一些功能进行测试。先在数据库中添加数据。
代码如下。mysql> use test;
Database changed
mysql> create table tab_user(
-> id int primary key auto_increment,
-> username varchar(20),
-> password varchar(20)
-> );
Query OK, 0 rows affected (0.17 sec)
mysql> insert into tab_user(username,password) values('gyh','passwd');
Query OK, 1 row affected (0.09 sec)
把执行过的sql文件保存在新建的update目录下面。添加完成之后加上一些方法进行测试,
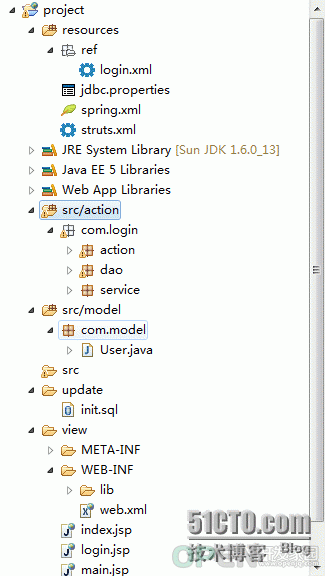
基本的配置至此完成。下面是目录结构
这里是项目源码。
| 
![]() 数据库
发布于:2021-07-04 11:35
|
阅读数:564
|
评论:0
数据库
发布于:2021-07-04 11:35
|
阅读数:564
|
评论:0


 QQ好友和群
 QQ空间
QQ空间