这篇文章主要为大家详细介绍了Spring定时任务,具有一定的参考价值,感兴趣的小伙伴们可以参考一下,希望能够给你带来帮助
一、定时任务
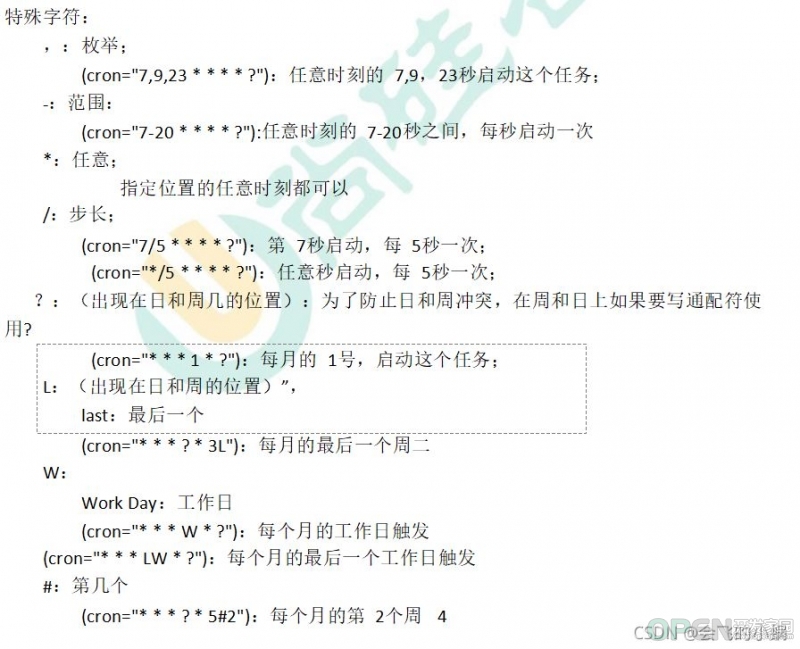
1、cron表达式
语法:秒 分 时 日 月 周 年
(其中“年”Spring不支持,也就是说在spring定时任务中只能设置:秒 分 时 日 月 周)
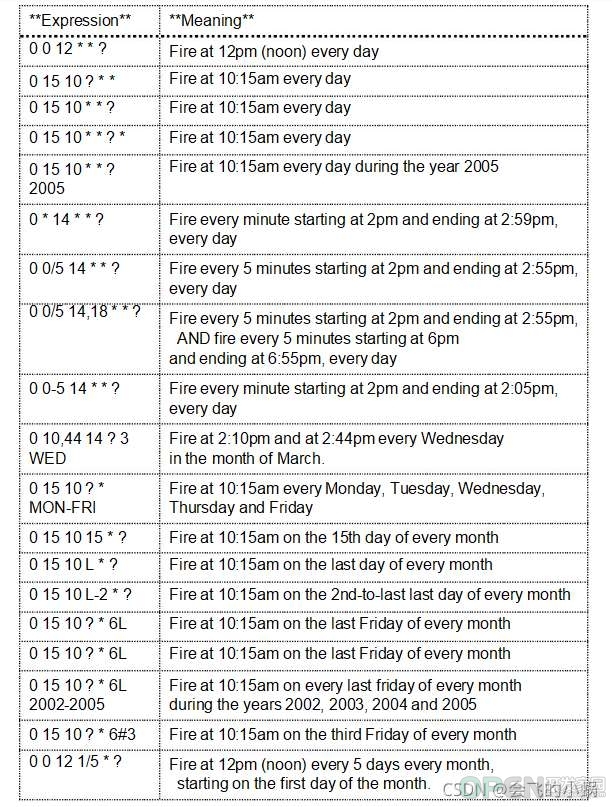
2、cron示例
3、SpringBoot整合
@EnableScheduling
@Scheduled
实例:package com.xunqi.gulimall.seckill.scheduled;
import lombok.extern.slf4j.Slf4j;
import org.springframework.scheduling.annotation.Async;
import org.springframework.scheduling.annotation.Scheduled;
import org.springframework.stereotype.Component;
import java.util.concurrent.TimeUnit;
/**
* @Description:
* @Created: with IntelliJ IDEA.
* @author: 夏沫止水
* @createTime: 2020-07-09 18:49
**/
/**
* 定时任务
* 1、@EnableScheduling 开启定时任务
* 2、@Scheduled开启一个定时任务
*
* 异步任务
* 1、@EnableAsync:开启异步任务
* 2、@Async:给希望异步执行的方法标注
*/
@Slf4j
@Component
@EnableScheduling
public class HelloScheduled {
/**
* 1、在Spring中表达式是6位组成,不允许第七位的年份
* 2、在周几的的位置,1-7代表周一到周日
* 3、定时任务不该阻塞。默认是阻塞的
* 1)、可以让业务以异步的方式,自己提交到线程池
* CompletableFuture.runAsync(() -> {
* },execute);
*
* 2)、支持定时任务线程池;设置 TaskSchedulingProperties
* spring.task.scheduling.pool.size: 5
*
* 3)、让定时任务异步执行
* 异步任务
*
* 解决:使用异步任务 + 定时任务来完成定时任务不阻塞的功能
*
*/
@Scheduled(cron = "*/1 * * * * ?")
public void hello() {
log.info("hello...");
try { TimeUnit.SECONDS.sleep(3); } catch (InterruptedException e) { e.printStackTrace(); }
}
}
定时任务默认是阻塞的线程,也就是说即使你设置成每一秒执行一次,但是方法内部的业务时间需要5秒才能执行完,也会造成定时任务每6秒才能执行一次。
当然我们可以开启异步线程:
@EnableAsync
@Async
实例:package com.xunqi.gulimall.seckill.scheduled;
import lombok.extern.slf4j.Slf4j;
import org.springframework.scheduling.annotation.Async;
import org.springframework.scheduling.annotation.Scheduled;
import org.springframework.stereotype.Component;
import java.util.concurrent.TimeUnit;
/**
* @Description:
* @Created: with IntelliJ IDEA.
* @author: 夏沫止水
* @createTime: 2020-07-09 18:49
**/
/**
* 定时任务
* 1、@EnableScheduling 开启定时任务
* 2、@Scheduled开启一个定时任务
*
* 异步任务
* 1、@EnableAsync:开启异步任务
* 2、@Async:给希望异步执行的方法标注
*/
@Slf4j
@Component
@EnableAsync
@EnableScheduling
public class HelloScheduled {
/**
* 1、在Spring中表达式是6位组成,不允许第七位的年份
* 2、在周几的的位置,1-7代表周一到周日
* 3、定时任务不该阻塞。默认是阻塞的
* 1)、可以让业务以异步的方式,自己提交到线程池
* CompletableFuture.runAsync(() -> {
* },execute);
*
* 2)、支持定时任务线程池;设置 TaskSchedulingProperties
* spring.task.scheduling.pool.size: 5
*
* 3)、让定时任务异步执行
* 异步任务
*
* 解决:使用异步任务 + 定时任务来完成定时任务不阻塞的功能
*
*/
@Async
@Scheduled(cron = "*/1 * * * * ?")
public void hello() {
log.info("hello...");
try { TimeUnit.SECONDS.sleep(3); } catch (InterruptedException e) { e.printStackTrace(); }
}
}
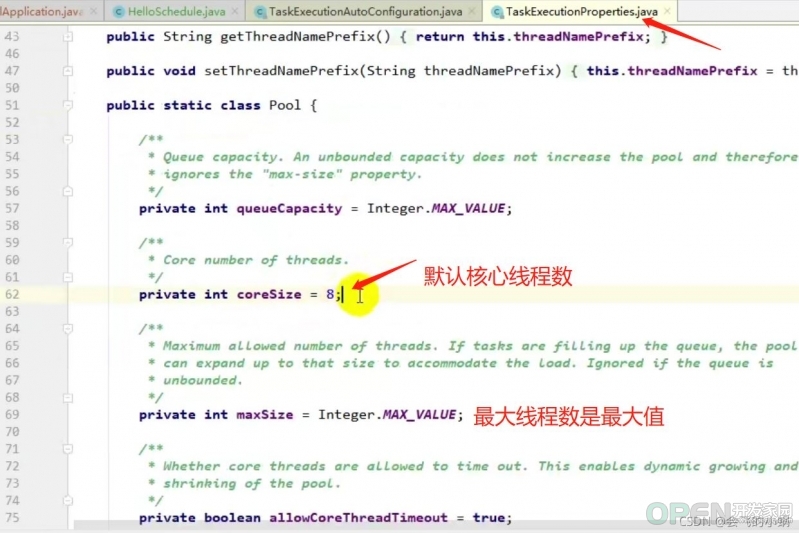
这样就会开启异步线程,并且是非阻塞线程,因为每次都会开启一个线程来执行,我们可以看一下源码配置的截图,这个就是异步执行的默认配置,核心线程数是8,最大线程数是无限大,这时如果一直每秒执行一次,则会造成服务器资源耗尽。

当然,我们可以在配置文件中进行定时任务线程池的设定:#核心线程数
spring.task.execution.pool.core-size=20
#最大线程数
spring.task.execution.pool.max-size=50
#队列大小
spring.task.execution.pool.queue-capacity=10000
总结
本篇文章就到这里了,希望能够给你带来帮助,也希望您能够多多关注CodeAE代码之家的更多内容!
原文链接:https://blog.csdn.net/YL3126/article/details/120580328
| 
![]() 编程语言
发布于:2022-01-26 13:10
|
阅读数:500
|
评论:0
编程语言
发布于:2022-01-26 13:10
|
阅读数:500
|
评论:0


 QQ好友和群
 QQ空间
QQ空间