前言:之前的文章介绍了通过快照的方式加速 Node.js 的启动,除了快照,V8 还提供了另一种技术加速代码的执行,那就是代码缓存。通过 V8 第一次执行 JS 的时候,V8 需要即时进行解析和编译 JS代码,这个是需要一定时间的,代码缓存可以把这个过程的一些信息保存下来,下次执行的时候,通过这个缓存的信息就可以加速 JS 代码的执行。本文介绍在 Node.js 里如何利用代码缓存技术加速 Node.js 的启动。
首先看一下 Node.js 的编译配置。'actions': [
{
'action_name': 'node_js2c',
'process_outputs_as_sources': 1,
'inputs': [
'tools/js2c.py',
'<@(library_files)',
'<@(deps_files)',
'config.gypi'
],
'outputs': [
'<(SHARED_INTERMEDIATE_DIR)/node_javascript.cc',
],
'action': [
'<(python)',
'tools/js2c.py',
'--directory',
'lib',
'--target',
'<@(_outputs)',
'config.gypi',
'<@(deps_files)',
],
},
],
通过这个配置,在编译 Node.js 的时候,会执行 js2c.py,并且把输入写到 node_javascript.cc 文件。我们看一下生成的内容。

里面定义了一个函数,这个函数里面往 source_ 字段里不断追加一系列的内容,其中 key 是 Node.js 中的原生 JS 模块信息,值是模块的内容,我们随便看一个模块 assert/strict。const data = [39,117,115,101, 32,115,116,114,105, 99,116, 39, 59, 10, 10,109,111,100,117,108,101, 46,101,120,112,111,114,116,115, 32,61, 32,114,101,113,117,105,114,101, 40, 39, 97,115,115,101,114,116, 39, 41, 46,115,116,114,105, 99,116, 59, 10];
console.log(Buffer.from(data).toString('utf-8'))
输出如下。'use strict';
module.exports = require('assert').strict;
通过 js2c.py ,Node.js 把原生 JS 模块的内容写到了文件中,并且编译进 Node.js 的可执行文件里,这样在 Node.js 启动时就不需要从硬盘里读取对应的文件,否则无论是启动还是运行时动态加载原生 JS 模块,都需要更多的耗时,因为内存的速度远快于硬盘。这是 Node.js 做的第一个优化,接下来看代码缓存,因为代码缓存是在这个基础上实现的。首先看一下编译配置。['node_use_node_code_cache=="true"', {
'dependencies': [
'mkcodecache',
],
'actions': [
{
'action_name': 'run_mkcodecache',
'process_outputs_as_sources': 1,
'inputs': [
'<(mkcodecache_exec)',
],
'outputs': [
'<(SHARED_INTERMEDIATE_DIR)/node_code_cache.cc',
],
'action': [
'<@(_inputs)',
'<@(_outputs)',
],
},
],}, {
'sources': [
'src/node_code_cache_stub.cc'
],
}],
如果编译 Node.js 时 node_use_node_code_cache 为 true 则生成代码缓存。如果我们不需要可以关掉,具体执行 ./configure --without-node-code-cache。如果我们关闭代码缓存, Node.js 关于这部分的实现是空,具体在 node_code_cache_stub.cc。const bool has_code_cache = false;
void NativeModuleEnv::InitializeCodeCache() {}
也就是什么都不做。如果我们开启了代码缓存,就会执行 mkcodecache.cc 生成代码缓存。int main(int argc, char* argv[]) {
argv = uv_setup_args(argc, argv);
std::ofstream out;
out.open(argv[1], std::ios::out | std::ios::binary);
node::per_process::enabled_debug_list.Parse(nullptr);
std::unique_ptrplatform = v8::platform::NewDefaultPlatform();
v8::V8::InitializePlatform(platform.get());
v8::V8::Initialize();
Isolate::CreateParams create_params;
create_params.array_buffer_allocator_shared.reset(
ArrayBuffer::Allocator::NewDefaultAllocator());
Isolate* isolate = Isolate::New(create_params);
{
Isolate::Scope isolate_scope(isolate);
v8::HandleScope handle_scope(isolate);
v8::Localcontext = v8::Context::New(isolate);
v8::Context::Scope context_scope(context);
std::string cache = CodeCacheBuilder::Generate(context);
out << cache;
out.close();
}
isolate->Dispose();
v8::V8::ShutdownPlatform();
return 0;
}
首先打开文件,然后是 V8 的常用初始化逻辑,最后通过 Generate 生成代码缓存。std::string CodeCacheBuilder::Generate(Localcontext) {
NativeModuleLoader* loader = NativeModuleLoader::GetInstance();
std::vectorids = loader->GetModuleIds();
std::mapdata;
for (const auto& id : ids) {
if (loader->CanBeRequired(id.c_str())) {
NativeModuleLoader::Result result;
USE(loader->CompileAsModule(context, id.c_str(), &result));
ScriptCompiler::CachedData* cached_data = loader->GetCodeCache(id.c_str());
data.emplace(id, cached_data);
}
}
return GenerateCodeCache(data);
}
首先新建一个 NativeModuleLoader。NativeModuleLoader::NativeModuleLoader() : config_(GetConfig()) {
LoadJavaScriptSource();
}
NativeModuleLoader 初始化时会执行 LoadJavaScriptSource,这个函数就是通过 python 生成的 node_javascript.cc 文件里的函数,初始化完成后 NativeModuleLoader 对象的 source_ 字段就保存了原生 JS 模块的代码。接着遍历这些原生 JS 模块,通过 CompileAsModule 进行编译。MaybeLocalNativeModuleLoader::CompileAsModule(
Localcontext,
const char* id,
NativeModuleLoader::Result* result) {
Isolate* isolate = context->GetIsolate();
std::vector<1local> parameters = {
FIXED_ONE_BYTE_STRING(isolate, "exports"),
FIXED_ONE_BYTE_STRING(isolate, "require"),
FIXED_ONE_BYTE_STRING(isolate, "module"),
FIXED_ONE_BYTE_STRING(isolate, "process"),
FIXED_ONE_BYTE_STRING(isolate, "internalBinding"),
FIXED_ONE_BYTE_STRING(isolate, "primordials")};
return LookupAndCompile(context, id, ¶meters, result);
}
接着看 LookupAndCompileMaybeLocalNativeModuleLoader::LookupAndCompile(
Localcontext,
const char* id,
std::vector<1local>* parameters,
NativeModuleLoader::Result* result) {
Isolate* isolate = context->GetIsolate();
EscapableHandleScope scope(isolate);
Localsource;
// 根据 key 从 source_ 字段找到模块内容
if (!LoadBuiltinModuleSource(isolate, id).ToLocal(&source)) {
return {};
}
std::string filename_s = std::string("node:") + id;
Localfilename =
OneByteString(isolate, filename_s.c_str(), filename_s.size());
ScriptOrigin origin(isolate, filename, 0, 0, true);
ScriptCompiler::CachedData* cached_data = nullptr;
{
Mutex::ScopedLock lock(code_cache_mutex_);
// 判断是否有代码缓存
auto cache_it = code_cache_.find(id);
if (cache_it != code_cache_.end()) {
cached_data = cache_it->second.release();
code_cache_.erase(cache_it);
}
}
const bool has_cache = cached_data != nullptr;
ScriptCompiler::CompileOptions options =
has_cache ? ScriptCompiler::kConsumeCodeCache
: ScriptCompiler::kEagerCompile;
// 如果有代码缓存则传入
ScriptCompiler::Source script_source(source, origin, cached_data);
// 进行编译
MaybeLocalmaybe_fun =
ScriptCompiler::CompileFunctionInContext(context,
&script_source,
parameters->size(),
parameters->data(),
0,
nullptr,
options);
Localfun;
if (!maybe_fun.ToLocal(&fun)) {
return MaybeLocal();
}
*result = (has_cache && !script_source.GetCachedData()->rejected)
? Result::kWithCache
: Result::kWithoutCache;
// 生成代码缓存保存下来,最后写入文件,下次使用
std::unique_ptrnew_cached_data(
ScriptCompiler::CreateCodeCacheForFunction(fun));
{
Mutex::ScopedLock lock(code_cache_mutex_);
code_cache_.emplace(id, std::move(new_cached_data));
}
return scope.Escape(fun);
}
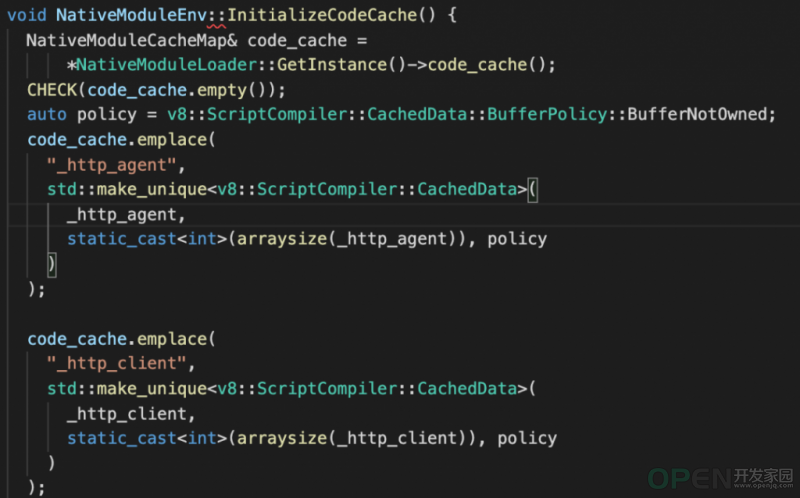
第一次执行的时候,也就是编译 Node.js 时,LookupAndCompile 会生成代码缓存写到文件 node_code_cache.cc 中,并编译进可执行文件,内容大致如下。

除了这个函数还有一系列的代码缓存数据,这里就不贴出来了。在 Node.js 第一次执行的初始化阶段,就会执行上面的函数,在 code_cache 字段里保存了每个模块和对应的代码缓存。初始化完毕后,后面加载原生 JS 模块时,Node.js 再次执行 LookupAndCompile,就个时候就有代码缓存了。当开启代码缓存时,我的电脑上 Node.js 启动时间大概为 40 毫秒,当去掉代码缓存的逻辑重新编译后,Node.js 的启动时间大概是 60 毫秒,速度有了很大的提升。
总结:Node.js 在编译时首先把原生 JS 模块的代码写入到文件并,接着执行 mkcodecache.cc 把原生 JS 模块进行编译和获取对应的代码缓存,然后写到文件中,同时编译进 Node.js 的可执行文件中,在 Node.js 初始化时会把他们收集起来,这样后续加载原生 JS 模块时就可以使用这些代码缓存加速代码的执行。
|

![]() 服务系统
发布于:2022-09-30 17:44
|
阅读数:454
|
评论:0
服务系统
发布于:2022-09-30 17:44
|
阅读数:454
|
评论:0


 QQ好友和群
 QQ空间
QQ空间